| VI.i Retrieving and Displaying Exif Data from a Photo | |
| Sample Code | |
| _exif.js |
EXIF data is what digital cameras add to your photos when you shoot them. There
are a myriad of properties such as: was the flash used, the ISO speed, exposure
time, the date the photo was taken, the date the photo was digitalized, the
camera model, weight, width, resolution and photographic terms that I have no
clue about.
You can fetch the data in the photos and display it automatically.Credit is due to 'bradles' at the Adobe User to User forums (check out the thread here) for the beginning of the code.
You can adapt the code to anything: you can now sort your pic by camera type, by wether or not the flash was used. You can write all the info to a textfile; possibilities are endless. In the following sample code, the script will take info from the EXIF object and display part of it (I chose shutter speed, camera model and date, and adding a name).
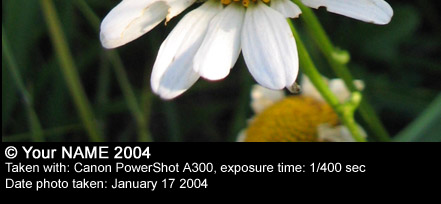
[ Here's what the script does! Link
for an alternative photo]
|

Note
Everything in the following script should be modified to fit your needs. Don't restrain yourself !
displayDialogs = DialogModes.NO;
var defaultRulerUnits = preferences.rulerUnits;
preferences.rulerUnits = Units.PIXELS;
//function below credited to 'bradles' over at the Adobe User to User forums.
function explodeArray(item,delimiter) {
tempArray=new Array(1);
var Count=0;
var tempString=new String(item);
while (tempString.indexOf(delimiter)>0) {
tempArray[Count]=tempString.substr(0,tempString.indexOf(delimiter));
tempString=tempString.substr(tempString.indexOf(delimiter)+1,tempString.length-tempString.indexOf(delimiter)+1);
Count=Count+1
}
tempArray[Count]=tempString;
return tempArray;
}
var AD = activeDocument;
var resRatio = AD.resolution/72;
if(resRatio!=1){
AD.resizeImage(AD.width,AD.height,72);
}
var heightVar = AD.height+2;
var black = new SolidColor();
black.rgb.red = black.rgb.green = black.rgb.blue = 0;
var white = new SolidColor();
white.rgb.red = white.rgb.green = white.rgb.blue = 255;
backgroundColor = black;
AD.resizeCanvas(AD.width+4,AD.height+4,AnchorPosition.MIDDLECENTER);
AD.resizeCanvas(AD.width,AD.height+60,AnchorPosition.TOPCENTER);
var exifData = AD.info.exif.toString();
explodeArray(exifData,","); //Use this function to put string into array.
for(n = 0; n < tempArray.length; n = n + 2 ) {
var stringTemp=tempArray[n]
if(stringTemp.indexOf("Exposure Time")!=-1){
var expTime = tempArray[n+1];
}
if(stringTemp.indexOf("Date Time Original")!=-1){
var phoTime = tempArray[n+1];
var dateArray1 = phoTime.split(" ", 1);
phoTime = dateArray1[0];
var dateArray2 = phoTime.split(":");
var monthsArray =["January",
"February",
"March",
"April",
"May",
"June",
"July",
"August",
"September",
"October",
"November",
"December"];
phoTime = monthsArray[dateArray2[1]-1]+" "+dateArray2[2]+" "+dateArray2[0];
}
if(stringTemp.indexOf("Model")!=-1){
var cameraModel = tempArray[n+1];
}
}
var nameLayer = AD.artLayers.add();
nameLayer.kind = LayerKind.TEXT;
var TI = nameLayer.textItem;
TI.position = [5,heightVar+16];
TI.contents = "© Your NAME 2004";
TI.font = "Arial";
TI.size = 16;
TI.color = white;
TI.fauxBold = true;
var infoLayer = AD.artLayers.add();
infoLayer.kind = LayerKind.TEXT;
var TI = infoLayer.textItem;
TI.position = [5,heightVar+30];
TI.contents = "Taken with: "+cameraModel+", exposure time: "+expTime+"\u000DDate photo taken: "+phoTime;
TI.font = "Arial";
TI.size = 13;
TI.color = white;
AD.flatten();
Note: CS USERS
Since version CS you no longer refer to 'AD.width' and 'AD.height' but 'AD.width.value' and 'AD.height.value', change that in your scripts to make it work !
On to our second sample code: Saving document layers as separate files with layer names as title
| page 6 / 11 |
|